

API Reference
Getting Started
Prerequisites
We assume that you have already:
- created a Google Cloud Platform (GCP) project
- created a service account
- sent the Chorus team its email address (a.k.a. "service account ID")
- sent the Chorus team the list of all developers who need access to these docs
Authentication overview
To send an authenticated request to the API, you must pass an auth token generated using credentials from the service account you've created.
Include the token as a request header as follows: Authorization: Bearer TOKEN_HERE. See our sample code for the exact format and examples.
Downloading service account credentials
To get credentials for the service account you've already created:
- Go to the Create Service Account Key page
- Select the service account whose email/ID you sent to the Chorus team
- Select
JSON(the default) for the key type - Click
Createto download the credentials
Store the credentials somewhere safe, and do not share them outside your organization. Anyone with these credentials will be able to make calls to our API as your organization.
Calling the API
Dependencies:
pip install absl-py==2.1.0 cryptography==42.0.4 pycparser==2.21 PyJWT==2.8.0 requests==2.32.3
pip install grpcio-tools==1.69.0 absl-py==2.1.0 cryptography==42.0.4 pycparser==2.21 PyJWT==2.8.0 requests==2.32.3
npm install jsonwebtoken@^9.0.0 yargs@^17.7.2
npm install @grpc/grpc-js@^1.12.5 grpc-tools@^1.12.4 jsonwebtoken@^9.0.0 yargs@^17.7.2
Once you have an API key and a service account (with its credentials), you're ready to start making requests!
To test an API, you can simply make a call to an API using the curl command,
e.g., to get data for a given device, you can run the following command:
curl -X POST -d "{'minRecordTime': '2023-02-02T05:15:20.637Z', \
'maxRecordTime': '2023-02-03T05:15:20.637Z',  \
'deviceIds':['%device_id_1%', '%device_id_2%'] }" \
--header "Authorization: Bearer $JWT_TOKEN" \
"https://api.chorussystems.net/v1alpha1/devices:listData"
Replace %device_id_1%, %device_id_2%, etc with your device ids. Change
record time range to your desired min/max time.
JWTs (JSON Web Tokens):
#!/usr/bin/env python3
import jwt
import time
import json
import argparse

SEC_IN_HOUR = 3600


def generate_jwt(credentials_path, api_domain):
  """Generates a signed JWT token to authenticate requests

  See https://developers.google.com/identity/protocols/oauth2/service-account#jwt-auth
  for details on the token format.

  Arguments:
    credentials_path: path to the service account's credentials (as a JSON file)
    api_domain: top-level domain of the API to call (e.g.,
    "api.chorussystems.net")

  Returns:
    a signed JWT token
  """
  credentials = json.load(open(credentials_path))
  issued_at_time_sec = time.time()
  expiration_time_sec = issued_at_time_sec + SEC_IN_HOUR
  payload = {"iss": credentials["client_email"],
             "sub": credentials["client_email"],
             "aud": "https://" + api_domain,
             "iat": issued_at_time_sec,
             "exp": expiration_time_sec}
  additional_headers = {"kid": credentials["private_key_id"]}
  return jwt.encode(payload, credentials["private_key"],
                    headers=additional_headers,
                    algorithm="RS256")

if __name__ == "__main__":
  parser = argparse.ArgumentParser(
      description="Generates a signed JWT for calling the Chorus API"
  )
  parser.add_argument("--credentialsPath", required=True, help="Path to the service account's credentials (as a JSON file)")
  parser.add_argument("--apiDomain", required=True, help="Top-level domain of the API to call (e.g., api.chorussystems.net)")
  args = parser.parse_args()
  print(generate_jwt(args.credentialsPath, args.apiDomain))
#!/usr/bin/env python3
import jwt
import time
import json
import argparse

SEC_IN_HOUR = 3600


def generate_jwt(credentials_path, api_domain):
  """Generates a signed JWT token to authenticate requests

  See https://developers.google.com/identity/protocols/oauth2/service-account#jwt-auth
  for details on the token format.

  Arguments:
    credentials_path: path to the service account's credentials (as a JSON file)
    api_domain: top-level domain of the API to call (e.g.,
    "api.chorussystems.net")

  Returns:
    a signed JWT token
  """
  credentials = json.load(open(credentials_path))
  issued_at_time_sec = time.time()
  expiration_time_sec = issued_at_time_sec + SEC_IN_HOUR
  payload = {"iss": credentials["client_email"],
             "sub": credentials["client_email"],
             "aud": "https://" + api_domain,
             "iat": issued_at_time_sec,
             "exp": expiration_time_sec}
  additional_headers = {"kid": credentials["private_key_id"]}
  return jwt.encode(payload, credentials["private_key"],
                    headers=additional_headers,
                    algorithm="RS256")

if __name__ == "__main__":
  parser = argparse.ArgumentParser(
      description="Generates a signed JWT for calling the Chorus external API"
  )
  parser.add_argument("--credentialsPath", required=True, help="Path to the service account's credentials (as a JSON file)")
  parser.add_argument("--apiDomain", required=True, help="Top-level domain of the API to call (e.g., api.chorussystems.net)")
  args = parser.parse_args()
  print(generate_jwt(args.credentialsPath, args.apiDomain))
import fs from "fs"
import jwt from "jsonwebtoken"

/**
 * Generates a signed JWT to authenticate requests.
 * See https://developers.google.com/identity/protocols/oauth2/service-account#jwt-auth
 * for details on the token format.
 * @param {string} serviceAccountCredentialsPath - the path to the service
 *    account's credentials (as a JSON file)
 * @param {string} apiDomain - top-level domain of the API to call (e.g.,
      "api.chorussystems.net")
 * @return {string} a signed JWT (valid for one hour)
 */
export const generateJwt = (
  serviceAccountCredentialsPath,
  apiDomain
) => {
  const credentials = JSON.parse(
    fs.readFileSync(serviceAccountCredentialsPath)
  );
  return jwt.sign({}, credentials["private_key"], {
    algorithm: "RS256",
    audience: "https://" + apiDomain,
    expiresIn: "1h",
    issuer: credentials["client_email"],
    keyid: credentials["private_key_id"],
    subject: credentials["client_email"],
  });
};
import fs from "fs"
import jwt from "jsonwebtoken"

/**
 * Generates a signed JWT to authenticate requests.
 * See https://developers.google.com/identity/protocols/oauth2/service-account#jwt-auth
 * for details on the token format.
 * @param {string} serviceAccountCredentialsPath - the path to the service
 *    account's credentials (as a JSON file)
 * @param {string} apiDomain - top-level domain of the API to call (e.g.,
      "api.chorussystems.net")
 * @return {string} a signed JWT (valid for one hour)
 */
export const generateJwt = (
  serviceAccountCredentialsPath,
  apiDomain
) => {
  const credentials = JSON.parse(
    fs.readFileSync(serviceAccountCredentialsPath)
  );
  return jwt.sign({}, credentials["private_key"], {
    algorithm: "RS256",
    audience: "https://" + apiDomain,
    expiresIn: "1h",
    issuer: credentials["client_email"],
    keyid: credentials["private_key_id"],
    subject: credentials["client_email"],
  });
};
To set the $JWT_TOKEN environment variable, run the following code. This code will output the JWT token as a string. Run export JWT_TOKEN=%Replace_With_Your_JWT_String_Here% to set the JWT_TOKEN variable.
Now you are ready to run the curl command!
After the curl command works, you can use any programming language with https POST
library to put this logic into your code.
Protobuf compilation:
We support both JSON/REST and gRPC/protobufs for interacting with our API. If your organization is not already familiar with gRPC/"protos", we recommend using JSON/REST when integrating with Chorus.
Note that compiling our protos is required in order to make gRPC calls.
You can find our protos here.
Compiling protos:
gRPC only please ignore.
python3 -m grpc_tools.protoc \
  --proto_path=<path_to_api-proto> \
  --python_out=. \
  --grpc_python_out=. \
  $(find <path_to_api-proto> -name '*.proto')
gRPC only please ignore.
mkdir -p jspb && \
node_modules/.bin/grpc_tools_node_protoc \
  --proto_path=<path_to_api-proto>\
  --proto_path=<path_to_api-proto>/google \
  --js_out=import_style=commonjs:jspb/ \
  --grpc_out=grpc_js:jspb/ \
  $(find <path_to_api-proto>/v1alpha1 <path_to_api-proto>/google -iname "*.proto")
Sandbox testing
Setup for calling our API
#!/usr/bin/env python3

from absl import app
from absl import flags
import requests

from generate_jwt import generate_jwt

FLAGS = flags.FLAGS

flags.DEFINE_string(
  "service_account_credentials_path",
  None,
  "Path to the JSON credentials file for the service account.",
)

flags.mark_flag_as_required("service_account_credentials_path")

API_DOMAIN = "api.chorussystems.net"
ENDPOINT_PATH = "/v1alpha1/devices:list"


def main(_):
  auth_token = generate_jwt(FLAGS.service_account_credentials_path, API_DOMAIN)
  headers = {"authorization": f"Bearer {auth_token}"}

  payload= { "pageSize": "50" }

  response = requests.post(
    f"https://{API_DOMAIN}{ENDPOINT_PATH}", json=payload, headers=headers
  )

  print(response)
  print(response.json())


if __name__ == "__main__":
  app.run(main)
#!/usr/bin/env python3

from absl import app
from absl import flags
from generate_jwt import generate_jwt
import grpc
from v1alpha1 import api_pb2_grpc as scout_grpc
from v1alpha1 import entity_pb2 as entity
from v1alpha1 import device_api_pb2 as device_api

FLAGS = flags.FLAGS

flags.DEFINE_string(
    "service_account_credentials_path",
    None,
    "Path to the JSON credentials file for the service account.",
)

flags.mark_flag_as_required("service_account_credentials_path")

API_DOMAIN = "api.chorussystems.net"
PORT = 443
TIMEOUT_SEC = 10


def main(_):
    auth_token = generate_jwt(FLAGS.service_account_credentials_path, API_DOMAIN)
    channel_credentials = grpc.ssl_channel_credentials()
    target_host = "{}:{}".format(API_DOMAIN, PORT)
    # Note: .close() should be called on a channel if a "with" statement is not
    # appropriate in the code.
    with grpc.secure_channel(target_host, channel_credentials) as channel:
        stub = scout_grpc.ScoutStub(channel)
        metadata = [
            # Add the signed JWT to authenticate the service account. For additional
            # details, see https://cloud.google.com/endpoints/docs/openapi/service-account-authentication#making_an_authenticated_request
            ("authorization", "Bearer " + auth_token)
        ]

        request = device_api.ListDevicesRequest(page_size=50)
        response = stub.ListDevices(request, TIMEOUT_SEC, metadata=metadata)

        print(response)


if __name__ == "__main__":
    app.run(main)
import yargs from "yargs"
import { generateJwt } from "./generate_jwt.js";

const API_DOMAIN = "api.chorussystems.net";

const argv = yargs(process.argv.slice(2))
.usage(
  "Usage: node $0 --service_account_credentials_path [path-to-file]"
)
.demandOption([
  "service_account_credentials_path"
])
.option("service_account_credentials_path", {
  description: "Path to the service account's credentials file (JSON)",
  type: "string",
})
.help()
.alias("help", "h")
.version(false).parse();


async function main() {
  const authToken = generateJwt(
    argv.service_account_credentials_path,
    API_DOMAIN
  );

  const headers = { "authorization": `Bearer ${authToken}` };
  const payload= { "pageSize": "50" };

  const response = await fetch(`https://${API_DOMAIN}/v1alpha1/devices:list`,
    {
      method: "POST",
      body: JSON.stringify(payload),
      headers: headers
    }
  );

  const data = await response.json();
  console.log(data);
}

main();
#!/usr/bin/env node

// NOTE: Import paths may vary

const grpc = require("@grpc/grpc-js");
const yargs = require("yargs");
const { ScoutClient } = require("../jspb/v1alpha1/api_grpc_pb.js");
const {
  ListDevicesRequest,
} = require("../jspb/v1alpha1/device_api_pb.js");
const { generateJwt } = require("./generate_jwt.js");

const API_DOMAIN = "api.chorussystems.net";

const argv = yargs
  .usage(
    "Usage: node $0 --service_account_email [email] --service_account_credentials_path [path-to-file]"
  )
  .demandOption([
    "service_account_email",
    "service_account_credentials_path",
  ])
  .option("service_account_email", {
    description: "Email address of the service account used for authentication",
    type: "string",
  })
  .option("service_account_credentials_path", {
    description: "Path to the service account's credentials file (JSON)",
    type: "string",
  })
  .help()
  .alias("help", "h")
  .version(false).argv;

function main() {
  const scoutClient = new ScoutClient(API_DOMAIN, grpc.credentials.createSsl());
  const authToken = generateJwt(
    argv.service_account_email,
    argv.service_account_credentials_path,
    API_DOMAIN
  );
  const metadata = new grpc.Metadata();
  // Add the signed JWT to authenticate the service account. For additional
  // details, see https://cloud.google.com/endpoints/docs/openapi/service-account-authentication#making_an_authenticated_request
  metadata.add("authorization", `Bearer ${authToken}`);

  const request =
    new ListDevicesRequest()
      .setPageSize(50)
  scoutClient.listDevices(request, metadata, (err, response) => {
    console.log(response.toObject());
  });
}

main();
Chorus supports "testing"/sandbox organizations that can be used to keep data separate from your true production data. Please work with your Chorus account manager to set up a sandbox org if you would like one.
NOTE: Don't forget that the API URL is used in two places:
- in the signed JWT passed in the Authorization header
- the URL for making the actual HTTP request
Device behavior
Tags/Sensors (beacons) are organization specific but readers are organization independent such that it will read information from beacons no matter what organization the reader is in.
NOTE: Scouts are both a reader and a beacon
Assets and Trips
Assets
Create an asset:
payload = { "asset": { "customer_id": "my-great-asset-1" }}

response = requests.post(
  f"https://{API_DOMAIN}/v1alpha1/assets", json=payload, headers=headers
)
print(response.json())
from v1alpha1 import asset_api_pb2 as asset_api
request = asset_api.CreateAssetRequest(
    asset=entity.Asset(customer_id="my-great-asset-1")
)
response = stub.CreateAsset(request, TIMEOUT_SEC, metadata=metadata)
print(response)
const payload = {
  "asset": { "customerId": "my-great-asset-1" }
};

const response = await fetch(`https://${API_DOMAIN}/v1alpha1/assets`,
  {
    method: "POST",
    body: JSON.stringify(payload),
    headers: headers
  }
);

const data = await response.json();
console.log(data);
const { CreateAssetRequest } = require("../jspb/v1alpha1/asset_api_pb.js");
const { Asset } = require("../jspb/v1alpha1/entity_pb.js")

const asset = new Asset().setCustomerId("my-great-asset-1");
const request =
  new CreateAssetRequest()
    .setAsset(asset);
scoutClient.createAsset(request, metadata, (err, response) => {
  console.log(response.toObject());
});
Start tracking the asset with a device:
payload = {
  "deviceId" : "12345678",
  "assetIdentifier": { "customerId": "my-great-asset-1" },
}

response = requests.post(
  f"https://{API_DOMAIN}/v1alpha1/trackings:start", json=payload, headers=headers
)
print(response.json())
from v1alpha1 import trip_api_pb2 as trip_api
request = trip_api.StartTrackingRequest(
    device_id="00004943",
    asset_identifier=entity.AssetIdentifier(customer_id="my-great-asset-1"),
)
response = stub.StartTracking(request, TIMEOUT_SEC, metadata=metadata)
print(response)
const payload = {
  "deviceId": "12345678",
  "assetIdentifier": { "customerId": "my-great-asset-1" },
}

const response = await fetch(`https://${API_DOMAIN}/v1alpha1/trackings:start`,
  {
    method: "POST",
    body: JSON.stringify(payload),
    headers: headers
  }
);

const data = await response.json();
console.log(data);
const { StartTrackingRequest } = require("../jspb/v1alpha1/trip_api_pb.js");
const { AssetIdentifier } = require("../jspb/v1alpha1/entity_pb.js");

const assetIdentifier = new AssetIdentifier().setCustomerId("my-great-asset-1");
const request =
  new StartTrackingRequest()
    .setDeviceId("00004943").setAssetIdentifier(assetIdentifier);
scoutClient.startTracking(request, metadata, (err, response) => {
  console.log(response.toObject());
});
An asset represents:
- a physical entity being tracked by a Scout device
The information about an asset is expected to be stored in a separate system external to Scout. Our system just keeps track of assets by ID and currently does not support storing customer-specific metadata.
Asset IDs
We expect that most clients already have their own asset IDs, such as barcode numbers. We refer to these as "customer IDs." The Scout system is optimized for cases where each physical asset has exactly one, unique customer ID, but that is not a requirement. However, we do not support associating multiple customer IDs to the same asset.
Regardless of whether your customer IDs are unique, our system automatically assigns a unique ID to each asset. We refer to such IDs as "Scout IDs" to distinguish them from customer IDs. If you want to keep track of these scout IDs, they're returned in the responses of most endpoints (e.g., CreateAsset).
Endpoints that involve specifying an existing asset, such as UpdateAsset, accept a message type named AssetIdentifier, which allows you to identify an asset by either Scout ID or customer ID. If you do not use duplicate IDs, then you can safely refer to assets using such "customer IDs." Conversely, if multiple assets can share the same customer ID, then identifying an asset via customer ID may become ambiguous, meaning that our system won't be able to determine which asset you're trying to refer to. If we receive an AssetIdentifier with a customer ID that refers to multiple assets, then we will reject the request with a FAILED_PRECONDITION error.
You can always safely use a Scout ID instead of a customer ID to refer to an asset because Scout IDs are guaranteed to be unique. This is mostly useful for cases in which:
- an asset doesn't have a customer ID, or
- an asset has a customer ID that is non-unique (which would otherwise lead to an ambiguous call).
Trips
Create a trip:
payload = { "trip": { "customer_id": "my-great-trip-1" }}

response = requests.post(
  f"https://{API_DOMAIN}/v1alpha1/trips", json=payload, headers=headers
)
print(response.json())
from v1alpha1 import trip_api_pb2 as trip_api

request = trip_api.CreateTripRequest(trip=entity.Trip(customer_id="my-great-trip-1"))
response = stub.CreateTrip(request, TIMEOUT_SEC, metadata=metadata)

print(response)
const payload = {
  "trip":
  { "customerId": "my-great-trip-1" }
};

const response = await fetch(`https://${API_DOMAIN}/v1alpha1/trips`,
  {
    method: "POST",
    body: JSON.stringify(payload),
    headers: headers
  }
);

const data = await response.json();
console.log(data);
const { CreateTripRequest } = require("../jspb/v1alpha1/trip_api_pb.js");
const { Trip } = require("../jspb/v1alpha1/entity_pb.js");

const trip = new Trip().setCustomerId("my-great-trip-1");
const request =
  new CreateTripRequest()
    .setTrip(trip);
scoutClient.createTrip(request, metadata, (err, response) => {
  console.log(response.toObject());
});
Update a trip's stage:
payload = {
  "newStage": "IN_TRANSIT",
  "tripIdentifier": { "customerId": "my-great-trip-1" },
}

response = requests.post(
  f"https://{API_DOMAIN}/v1alpha1/trips:updateStage", json=payload, headers=headers
)
print(response.json())
request = trip_api.UpdateTripStageRequest(
    trip_identifier=entity.TripIdentifier(customer_id="my-great-trip-1"),
    new_stage="IN_TRANSIT",
)
response = stub.UpdateTripStage(request, TIMEOUT_SEC, metadata=metadata)

print(response)
const payload = {
  "newStage": "IN_TRANSIT",
  "tripIdentifier": { "customerId": "my-great-trip-1" },
}

const response = await fetch(`https://${API_DOMAIN}/v1alpha1/trips:updateStage`,
  {
    method: "POST",
    body: JSON.stringify(payload),
    headers: headers
  }
);

const data = await response.json();
console.log(data);
const { UpdateTripStageRequest } = require("../jspb/v1alpha1/trip_api_pb.js");
const { Trip, TripIdentifier } = require("../jspb/v1alpha1/entity_pb.js");

const tripIdentifier = new TripIdentifier().setCustomerId("my-great-trip-1");
const tripStageEnum = Trip.TripStage;
const request =
  new UpdateTripStageRequest()
    .setTripIdentifier(tripIdentifier).setNewStage(tripStageEnum.IN_TRANSIT);
scoutClient.updateTripStage(request, metadata, (err, response) => {
  console.log(response.toObject());
});
Start tracking the trip with a device:
payload = {
  "deviceId" : "12345678",
  "tripIdentifier": { "customerId": "my-great-trip-1" },
}

response = requests.post(
  f"https://{API_DOMAIN}/v1alpha1/trackings:start", json=payload, headers=headers
)
print(response.json())
request = trip_api.StartTrackingRequest(
    device_id="12345678",
    trip_identifier=entity.TripIdentifier(customer_id="my-great-trip-1"),
)
response = stub.StartTracking(request, TIMEOUT_SEC, metadata=metadata)

print(response)
const payload = {
  "deviceId": "12345678",
  "tripIdentifier": { "customerId": "my-great-trip-1" },
}

const response = await fetch(`https://${API_DOMAIN}/v1alpha1/trackings:start`,
  {
    method: "POST",
    body: JSON.stringify(payload),
    headers: headers
  }
);

const data = await response.json();
console.log(data);
const { StartTrackingRequest } = require("../jspb/v1alpha1/trip_api_pb.js");

const tripIdentifier = new TripIdentifier().setCustomerId("my-great-trip-1");
const request =
  new StartTrackingRequest()
    .setDeviceId("12345678").setTripIdentifier(tripIdentifier);
scoutClient.startTracking(request, metadata, (err, response) => {
  console.log(response.toObject());
Get all the details about that trip:
payload = {
  "tripIdentifier": { "customerId": "my-great-trip-1" }
}

response = requests.post(
  f"https://{API_DOMAIN}/v1alpha1/trips:get", json=payload, headers=headers
)
print(response.json())
request = trip_api.GetTripRequest(
    trip_identifier=entity.TripIdentifier(customer_id="my-great-trip-1"),
)
response = stub.GetTrip(request, TIMEOUT_SEC, metadata=metadata)

print(response)
const payload = {
  "tripIdentifier": { "customerId": "my-great-trip-1" }
}

const response = await fetch(`https://${API_DOMAIN}/v1alpha1/trips:get`,
  {
    method: "POST",
    body: JSON.stringify(payload),
    headers: headers
  }
);

const data = await response.json();
console.log(data);
const { GetTripRequest } = require("../jspb/v1alpha1/trip_api_pb.js");

const tripIdentifier = new TripIdentifier().setCustomerId("my-great-trip-1");
const request =
  new GetTripRequest()
    .setTripIdentifier(tripIdentifier);
scoutClient.getTrip(request, metadata, (err, response) => {
  console.log(response.toObject());
});
Get the alerts that happened in the past day on that trip:
from datetime import datetime, timedelta
minIncidentTime = (datetime.utcnow() - timedelta(days=1)).isoformat() + "Z"

payload = {
  "minIncidentTime": minIncidentTime,
  "tripIdentifier": { "customerId": "my-great-trip-1" },
}

response = requests.post(
  f"https://{API_DOMAIN}/v1alpha1/alerts", json=payload, headers=headers
)
print(response.json())
from v1alpha1 import alert_api_pb2 as alert_api
from datetime import datetime, timedelta

minIncidentTime = datetime.now() - timedelta(days=1)
request = alert_api.ListAlertsRequest(
    minIncidentTime=minIncidentTime,
    trip_identifier=entity.TripIdentifier(customer_id="my-great-trip-1"),
)
response = stub.ListAlerts(request, TIMEOUT_SEC, metadata=metadata)

print(response)
const minIncidentTime = new Date(Date.now() - 24 * 60 * 60 * 1000).toISOString();

const payload = {
  "minIncidentTime": minIncidentTime,
  "tripIdentifier": { "customerId": "my-great-trip-1" },
}

const response = await fetch(`https://${API_DOMAIN}/v1alpha1/alerts`,
  {
    method: "POST",
    body: JSON.stringify(payload),
    headers: headers
  }
);

const data = await response.json();
console.log(data);
const { ListAlertsRequest } = require("../jspb/v1alpha1/alert_api_pb.js");
const { Timestamp } = require("../jspb/google/protobuf/timestamp_pb.js");

const SEC_IN_DAY = 60 * 60 * 24;
const nowSec = Math.floor(new Date().getTime() / 1e3);

const tripIdentifier = new TripIdentifier().setCustomerId("my-great-trip-1");
const request =
  new ListAlertsRequest()
    .setMinIncidentTime(new Timestamp().setSeconds(nowSec - SEC_IN_DAY))
    .setTripIdentifier(tripIdentifier);
scoutClient.listAlerts(request, metadata, (err, response) => {
  console.log(response.toObject());
});
A trip is a logical construct representing the planned journey of any number of devices and/or assets from an origin to a destination. Trips can also be associated with points in time, such as scheduled departure and arrival times, but these are not strictly required.
We also allow defining trips without an origin and/or a destination set, but we don't expect such trips to be useful in practice.
Origins and destinations
Trip origins and destinations are specified as locations with nonzero area, which we refer to as places. Currently, we only support one type of places: a geopoint (latitude + longitude) with a radius (in meters).
You can reuse existing places (see places section) in different trips by specifying the place name and optionally the organization name if place does not belong to you. Make sure you have visibility over the organization that owns the place.
You are still able to use latitude and longitude as inputs for the origin or destination. We will try to find and match places by latitude and longitude if it belongs to you. However, there are no guarantees that you will be able to trace the history of deliveries between two places later on if the place name was not specified.
Note: We highly recommend creating a place via the Place API and referring to created places by name in the origin and destination. Do not use both (name and latitude, longitude) at the same time in the request.
Origins and destinations will be used to (among other things) detect automatically whether an asset (or device) has started or ended its journey, which is useful for alerting. This functionality is still being implemented.
Trip stages
A trip has multiple stages, which are useful for (for example):
- configuring sensor-based alerts to trigger only during certain parts of the trip, or
- setting notifications that trigger as a trip progresses between stages.
Our trip model is summarized by the following diagram:
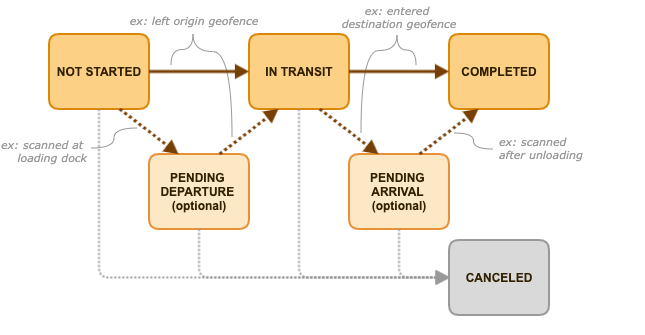
All new trips initially start in the NOT_STARTED stage, which typically represents a trip that has been scheduled for sometime in the future.
For simple use cases, a trip can transition from NOT_STARTED to IN_TRANSIT upon departure from the origin, and then from IN_TRANSIT to COMPLETED upon arrival at the destination.
For more complex use cases, we also support optional stages: PENDING_DEPARTURE and PENDING_ARRIVAL. For example, a trip might be PENDING_DEPARTURE while the assets are sitting on the loading dock at the origin; this might be useful if you want temperature alerts to trigger during this phase, before the assets have actually left the origin.
We also support canceling trips that cannot be completed for some reason. Canceled trips remain in the system, so there will still be a record of the trip.
Currently, the only way to change a trip's stage is by calling UpdateTripStage. In the near future, we will support defining conditions under which a trip will automatically transition between stages (e.g., transitioning from NOT_STARTED to IN_TRANSIT after all the assets have left the origin, based on GPS data).
Only the stage transitions depicted in the diagram are valid. For example, it is not possible to transition directly from NOT_STARTED to COMPLETED. Furthermore, we currently do not support undoing state transitions or otherwise moving "backward" to previous stages.
Points in time
We support associating several points in time with a scheduled trip:
scheduled_start_time: the time when the trip is supposed to exit theNOT_STARTEDstagescheduled_departure_time: the time when the trip is supposed to enter theIN_TRANSITstagescheduled_arrival_time: the time when the trip is supposed to exit theIN_TRANSITstagescheduled_end_time: the time when the trip is supposed to enter theCOMPLETEDstage
Currently, scheduling these times has no effect, but they will be used in conjunction with alerting.
We also automatically log the "actual" times when these events occur. This information is returned for all fetched trips. These fields are defined analogously to those listed above; explicitly, they are:
actual_start_time: the time when the trip exits theNOT_STARTEDstageactual_departure_time: the time when the trip enters theIN_TRANSITstageactual_arrival_time: the time when the trip exits theIN_TRANSITstageactual_end_time: the time when the trip enters theCOMPLETEDorCANCELEDstage
Notice that actual_end_time will be set when a trip is canceled.
The scheduled transition times are set and updated by you, but the "actual" transition times are assigned automatically by the system and cannot be modified.
Trip IDs
Much like assets, trips can be assigned customer IDs (e.g., shipment numbers). Trips are also always assigned Scout IDs by the server.
The behavior of trip IDs (and consequently, TripIdentifier) is identical to asset IDs (and AssetIdentifier). See the Asset IDs section above for details.
Entity relationships
Start tracking an asset with a device:
payload = {
  "deviceId" : "12345678",
  "assetIdentifier": { "customerId": "my-great-asset-1" },
}

response = requests.post(
  f"https://{API_DOMAIN}/v1alpha1/trackings:start", json=payload, headers=headers
)
print(response.json())
from v1alpha1 import trip_api_pb2 as trip_api
request = trip_api.StartTrackingRequest(
    device_id="00004943",
    asset_identifier=entity.AssetIdentifier(customer_id="my-great-asset-1"),
)
response = stub.StartTracking(request, TIMEOUT_SEC, metadata=metadata)
print(response)
const payload = {
  "deviceId": "12345678",
  "assetIdentifier": { "customerId": "my-great-asset-1" },
}

const response = await fetch(`https://${API_DOMAIN}/v1alpha1/trackings:start`,
  {
    method: "POST",
    body: JSON.stringify(payload),
    headers: headers
  }
);

const data = await response.json();
console.log(data);
const { StartTrackingRequest } = require("../jspb/v1alpha1/trip_api_pb.js");
const { AssetIdentifier } = require("../jspb/v1alpha1/entity_pb.js");

const assetIdentifier = new AssetIdentifier().setCustomerId("my-great-asset-1");
const request =
  new StartTrackingRequest()
    .setDeviceId("00004943").setAssetIdentifier(assetIdentifier);
scoutClient.startTracking(request, metadata, (err, response) => {
  console.log(response.toObject());
});
End the tracking:
payload = {
  "deviceId" : "12345678",
  "assetIdentifier": { "customerId": "my-great-asset-1" },
}

response = requests.post(
  f"https://{API_DOMAIN}/v1alpha1/trackings:end", json=payload, headers=headers
)
print(response.json())
from v1alpha1 import trip_api_pb2 as trip_api
request = trip_api.EndTrackingRequest(
    device_id="00004943",
    asset_identifier=entity.AssetIdentifier(customer_id="my-great-asset-1"),
)
response = stub.EndTracking(request, TIMEOUT_SEC, metadata=metadata)
print(response)
const payload = {
  "deviceId": "12345678",
  "assetIdentifier": { "customerId": "my-great-asset-1" },
}

const response = await fetch(`https://${API_DOMAIN}/v1alpha1/trackings:end`,
  {
    method: "POST",
    body: JSON.stringify(payload),
    headers: headers
  }
);

const data = await response.json();
console.log(data);
const { EndTrackingRequest } = require("../jspb/v1alpha1/trip_api_pb.js");
const { AssetIdentifier } = require("../jspb/v1alpha1/entity_pb.js");

const assetIdentifier = new AssetIdentifier().setCustomerId("my-great-asset-1");
const request =
  new EndTrackingRequest()
    .setDeviceId("00004943").setAssetIdentifier(assetIdentifier);
scoutClient.endTracking(request, metadata, (err, response) => {
  console.log(response.toObject());
});
We refer to trips, assets, and devices collectively as entities.
Association types
We currently support the following entity associations:
- trip, asset, device: The device is tracking the asset, an asset is associated with a trip, then the asset and device is on the trip.
- trip, device: If a device is associated with a trip, then the device is on the trip.
- asset, device: If a device is associated with an asset, then it is tracking the asset.
Trackings
Trackings refer to the association between entities (i.e. "pairing"). Use
/trackings:start to start tracking a trip or an asset with a device. Use
/trackings:end to end a tracking between a trip or an asset and a device.
List devices passing the trip's ID:
payload = {"tripIdentifier": {"customerId": "my-great-trip-1"}}

response = requests.post(
  f"https://{API_DOMAIN}/v1alpha1/devices:list", json=payload, headers=headers
)
print(response.json())
from v1alpha1 import device_api_pb2 as device_api

request = device_api.ListDevicesRequest(
    trip_identifier=entity.TripIdentifier(customer_id="my-great-trip-1"),
)
response = stub.ListDevices(request, TIMEOUT_SEC, metadata=metadata)

print(response)
const payload = {
  "tripIdentifier":
  { "customerId": "my-great-trip-1" }
};

const response = await fetch(`https://${API_DOMAIN}/v1alpha1/devices:list`,
  {
    method: "POST",
    body: JSON.stringify(payload),
    headers: headers
  }
);

const data = await response.json();
console.log(data);
const { ListDevicesRequest } = require("../jspb/v1alpha1/device_api_pb.js");
const { TripIdentifier } = require("../jspb/v1alpha1/entity_pb.js");

const tripIdentifier = new TripIdentifier().setCustomerId("my-great-trip-1");
const request =
  new ListDevicesRequest()
    .setTripIdentifier(tripIdentifier);
scoutClient.listDevices(request, metadata, (err, response) => {
  console.log(response.toObject());
});
Checking associations
You can check which entities are associated with another asset by using List calls. For example, to determine which devices are on a given trip, you can call ListDevices and pass the trip's ID (either its customer ID or its Scout ID) in the request.
We do not yet support "heterogeneous" calls (i.e., calls that return multiple types of entities simultaneously).
Attributes
Apply an attribute with a string value to the trip:
payload = {
    "allowNewKey": True,
    "tripIdentifier": {"customerId": "my-great-trip-1"},
    "attribute": {
        "key": "attribute key",
        "stringValue": "attribute string value",
    },
}

response = requests.post(
  f"https://{API_DOMAIN}/v1alpha1/attributes:apply", json=payload, headers=headers
)
print(response.json())
from v1alpha1 import attribute_pb2 as attribute
from v1alpha1 import attribute_api_pb2 as attribute_api

request = attribute_api.ApplyAttributeRequest(
    allow_new_key=True,
    trip_identifier=entity.TripIdentifier(customer_id="my-great-trip-1"),
    attribute=attribute.Attribute(
        key="attribute key", string_value="attribute string value"
    ),
)
response = stub.ApplyAttribute(request, TIMEOUT_SEC, metadata=metadata)

print(response)
const payload = {
  "allowNewKey": True,
  "tripIdentifier":
  { "customerId": "my-great-trip-1" },
  "attribute": {
      "key": "attribute key",
      "stringValue": "attribute string value",
  },
};

const response = await fetch(`https://${API_DOMAIN}/v1alpha1/attributes:apply`,
  {
    method: "POST",
    body: JSON.stringify(payload),
    headers: headers
  }
);

const data = await response.json();
console.log(data);
const { ApplyAttributeRequest } = require("../jspb/v1alpha1/attribute_api_pb.js");
const { Attribute } = require("../jspb/v1alpha1/attribute_pb.js");

const tripIdentifier = new TripIdentifier().setCustomerId("my-great-trip-1");
const attribute = new Attribute().setKey("attribute key").setStringValue("attribute string value");
const request =
  new ApplyAttributeRequest()
    .setAllowNewKey(true)
    .setTripIdentifier(tripIdentifier)
    .setAttribute(attribute);
scoutClient.applyAttribute(request, metadata, (err, response) => {
  console.log(response.toObject());
});
Attributes are used to add arbitrary metadata to an entity.
Attributes consist of a key and an optional value. For example, you could apply the attribute key "cold chain" to an asset, or the key <> value pair "Shipment Type" => "Air."
You can find full Attribute API in the documentation /attributes
Attribute types
We currently support 5 different data types for attributes:
- Empty: Only the attribute key exists
- String: The attribute value is of datatype String e.g., "Lot 1"
- Integer: The attribute value is of datatype Integer e.g., 1
- Decimal: The attribute value is of datatype Decimal e.g., 1.12
- Timestamp: The attribute value is of datatype Timestamp e.g., 2021-01-01T01:01:01Z
NOTE: An attribute key can only have one type of attribute value.
Places
Place represents a building (e.g. store, warehouse, distribution center) or a meaningful area with some boundaries (e.g. construction site, junkyard or parking lot). You can find Place API in the documentation /places.
Places already used in Trips and Alerts. If you imagine your logistics network as a graph, then the places would be nodes and the trips would be edges of the graph.
Limitations: - Place name has to be unique (per organization) - No Place Deletion via API - No Place Update via API
You have to specify the organization's name if you create a place on behalf of another organization (you have to have permission to do this). Radius is not required, but recommended.
Note: Do not create more than one place for one street address (per org).
Data Querying API
This page supplements the documentation in the API reference and generally assumes familiarity with the data format. We recommend skimming through the documentation for /devices:listData first.
Data points
Aggregation
Devices can upload data to our servers in two different ways:
- via LTE or WiFi, directly to the server
- via BLE, through an aggregator (which itself uploads data to the server via LTE or WiFi)
Because Explorers only communicate via BLE, they can't upload data without the help of an aggregator.
When a Explorer or a Scout tracker communicates with an aggregator, we say that the Explorer or Scout tracker was "seen" by the aggregator. This "sighting" gives us information about the location of the Explorer or Scout tracker, as it indicates that it was near the aggregator, whose location is generally known.
In a data point
A full data point returned by /devices:listData comprises two parts:
- our most up-to-date information about the device itself: location, temperature, pressure, battery
- information (including location) about the aggregator via which the device uploaded data, if applicable
WARNING: The location mentioned in #1 does not account for aggregators. Currently, that location is derived entirety from GPS/WiFi/cell tower data from the device itself. (See the "Location data" section below for more information about how that happens.)
If the device uploaded data via multiple methods, even simultaneously, we emit one data point per upload. For example, if a Scout tracker uploads its own data via LTE and is simultaneously seen by two different aggregators, three data points will be returned by the API: one for the direct upload and one per "sighting" by an aggregator.
If the device uploaded its own data, part #2 of the corresponding data point will be empty because there won't be an aggregator to return information about.
As mentioned above, location information about the device itself is only uploaded directly, so the location in #1 will only be populated after the server has processed location data directly uploaded by the device.
If you just want the stream of location information from these data points, we recommend that you process each data point by first checking #2. If there is aggregator information, use the location of the aggregator. Otherwise, if there isn't aggregator information, check for location data in #1. This ensures that you see a location from each source at least once. Note that this is slightly more complex because of how the server processes location data; see "Location data" below.
Uniquely identifying data points
As discussed in the "Location data" section below, you may sometimes see updated versions of the same data point while polling as location information improves over time.
To distinguish data points from /devices:listData, you can look at the "primary key" of the data point, which consists of:
device_idrecord_timeaggregator_details.aggregator_device_idaggregator_details.seen_time
Conceptually, this is just a combination of "seen" device information (#1 and #2) and aggregator device information (#3 and #4). Recall that aggregator_details is not set when a device uploads its own data, so #3 and #4 may both be null.
Device IDs are unique across all devices of all types, so you do not need to check the device types.
Note that for Explorers, #2 and #4 will always be the same because record_time is assigned by aggregators (since the Explorer itself does not have a clock), but that does not apply to all types of devices.
Across multiple calls, if you see two data points whose values for all 4 fields exactly match, you can assume that you're looking at two versions of the same data point, where the version returned later (with a later server_processing_time) is the more up-to-date version. We guarantee that you will never receive two copies of the same data point in the same response or while paginating through the same set of results.
Example for /devices:listData
Retrieving device data for the last 24 hours:
from datetime import datetime, timedelta
minServerProcessingTime = (datetime.utcnow() - timedelta(days=1)).isoformat() + "Z"

payload = {
  "minServerProcessingTime": minServerProcessingTime,
  "pageSize": 1000,
  "deviceIds": device_ids,
}

response = requests.post(
  f"https://{API_DOMAIN}/v1alpha1/devices:listData", json=payload, headers=headers
)
print(response.json())
from datetime import datetime, timedelta
minServerProcessingTime = datetime.now() - timedelta(days=1)

request = data_api.ListDeviceDataRequest(
    min_server_processing_time=minServerProcessingTime,
    page_size=100,
    device_ids=deviceIds,
)
response = stub.ListDeviceData(request, TIMEOUT_SEC, metadata=metadata)

print(response)
const minServerProcessingTime = new Date(Date.now() - 24 * 60 * 60 * 1000).toISOString();

const payload = {
  "minServerProcessingTime": minServerProcessingTime,
  "pageSize": 1000,
  "deviceIds": device_ids,
};

const response =  await fetch(`https://${API_DOMAIN}/v1alpha1/devices:listData`,
  {
    method: "POST",
    body: JSON.stringify(payload),
    headers: headers
  }
);

const data = await response.json();
console.log(data);
const { ListDeviceDataRequest } = require("../jspb/v1alpha1/data_api_pb.js");
const { Timestamp } = require("../jspb/google/protobuf/timestamp_pb.js");

const SEC_IN_DAY = 60 * 60 * 24;
const nowSec = Math.floor(new Date().getTime() / 1e3);

const request =
  new ListDeviceDataRequest()
    .setMinServerProcessingTime(new Timestamp().setSeconds(nowSec - SEC_IN_DAY))
    .setPageSize(100)
    .setDeviceIdsList("12345678");
scoutClient.listDeviceData(request, metadata, (err, response) => {
  console.log(response.toObject());
});
Suppose that you have a Explorer, a Scout tracker, and a Scout aggregator, all in range of each other, as pictured below. Note that WiFi Access Points function similarly to Scout aggregators, so this example works almost identically if you have a WiFi Access Point in place of the Scout aggregator.
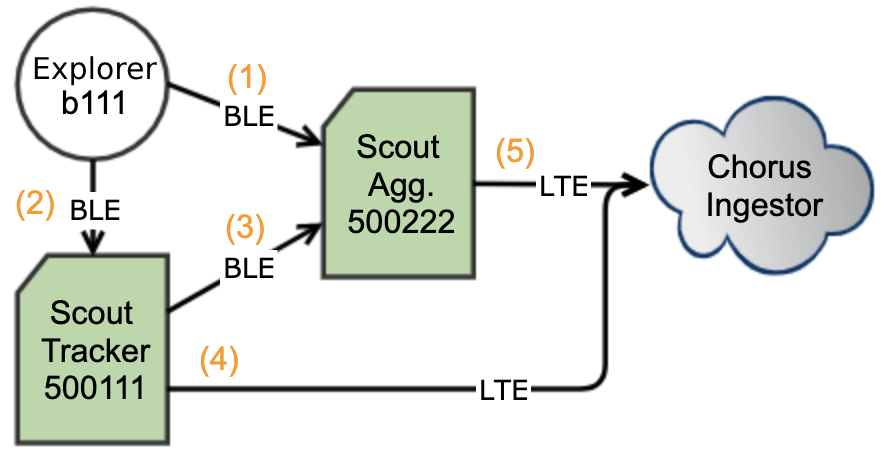
Five different types of data points can be uploaded by these devices. (Notice that Scout trackers can pick up signals from Explorers, just like Scout aggregators can.) We summarize these data points in the table below, with timestamps omitted for simplicity:
| # | device_id | aggregator_details | own_location set? |
|---|---|---|---|
| 1 | b111 | info about & location of 500222 | never |
| 2 | b111 | info about & location of 500111 | never |
| 3 | 500111 | info about & location of 500222 | maybe* |
| 4 | 500111 | not set | yes** |
| 5 | 500222 | not set | yes** |
The sensor data (e.g., temperature) in the data point will always have been recorded by device_id.
* This depends on whether data point (4) was recorded simultaneously and has already been processed by the server. If so, we leave this field set, as opposed to seemingly "clearing" it (since we may have previously emitted a data point with the location present).
** While polling, it's possible for you to see a copy of this data point without the location set if the server is still processing the location data, but you will later get an updated version with the location set. See the "Location data" section below.
For an example of retrieving data points from the /devices:listData endpoint, check out the sample code here
Location data
Depending on the device type, location data may come from a variety of sources:
- known, fixed locations - In some cases (e.g., fixed WiFi Access Points), we already know the location of the device beforehand.
- on-device GPS
- geolocation
In general, GPS is unreliable indoors, so Scouts' locations are derived from nearby WiFi access points the majority of the time.
When available, we provide the estimated accuracy along with the latitude and longitude of the derived location.
Note that not every data point is guaranteed to have a derived location. For example, if a device has no LTE connection, can't get a GPS lock, and isn't near any WiFi access points, then we won't be able to derive its location.
Server processing
To derive a Scout's location, Chorus uses a myriad of signals (e.g., GPS, WiFi access points, nearby beacons, cell tower info). This computation can take some time, hence the data point without location is typically saved first, then updated with the location information. This is typically done within a few seconds but may take longer in some circumstances.
Consequently, we process data points up to twice:
- when the data point is first uploaded
- when geolocation for that data point completes (if geolocation was necessary)
Data points that do not require geolocation (e.g., data points from fixed WiFi Access Points with known locations) will not be processed a second time.
The "server processing time" reflects the last time the data point was updated. In general, this is the field used when polling the API; see the "Polling" section below.
Consequently, you might see the same data point twice: once before and once after the geolocation completes. For example, the following sequence of events is technically possible:
- At 9:01am, a data point requiring geolocation is uploaded to the server.
- At 9:02am you request data processed between 9:00am and 9:02am. You'll see that data point with no location data and
server_processing_timeset to 9:01am. - At 9:03am, geolocation for that data point completes, and the server updates the data in-place.
- At 9:04am, you request data processed between 9:02am and 9:04am. You'll see that data point again, this time with location data present and
server_processing_timeset to 9:03am.
Notice that because the data point is updated in place:
- If at 9:04am you request data processed between 9:00am and 9:02am, then you won't see the data point in the response.
- If at 9:04am you request data processed between 9:00am and 9:04am, then you'll see the data point once in the response, with location data present and
server_processing_timeset to 9:03am.
However, this situation happens infrequently in practice since (as mentioned above) geolocation generally completes within a few seconds of the upload time.
All that said, we eventually will start updating locations multiple times. As we receive more data from the device, we can sometimes improve our understanding of its location. When this happens, we will emit another copy of the data point with an updated location and an updated server processing time. Although this hasn't yet been implemented, this is an active area of development.
NOTE: For Scout devices only: if the device is stationary, location data will only be returned every hour until movement is detected.
Polling
For polling, we strongly recommend making requests using the min_server_processing_time and max_server_processing_time filters in the request proto. This is the only polling method that will guarantee that you receive every data point at least once. Otherwise, you may miss backfilled data.
Scouts will try to upload data periodically, but a Scout may fail to connect to LTE. In this situation, the Scout will store the data that failed to upload and then upload that data later when it successfully connects to LTE. As a result, the server may receive arbitrarily old data from Scouts.
If you poll using record_time (for /devices:listData), such as by making a request every N minutes for data points with a record_time in the last N minutes, then you'll never see a backfilled data point that was uploaded longer than N minutes after the aggregator collected the data. This is not a problem if you follow a similar scheme but use the server_processing_time instead.
However, polling using the server_processing_time may cause you to see the same data point more than once. See the previous section for details.
Maximizing performance
Although performance is dependent on a number of factors, request runtime generally follows these patterns:
- The number of devices has the largest effect on performance. Runtime scales close to linearly (i.e., with slope 1) with the number of devices. That is, a request for 2N devices will take roughly twice the amount of time as a request for N devices. If no
device_idsfilter is provided in the request, then this depends on the number of devices visible to your organization. When requesting device data from the API, it is highly recommended you specify the device IDs you would like to target. Not specifying adevice_idsfilter will cause your requests for device data points to slow as you add more devices to your organization. An example of using thedevice_idsfilter while still retrieving data points for all your devices can be found here. - Runtime scales linearly with
page_sizebut generally with slope less than 1. That is, a request with page size 2N will generally take less than twice the amount of time as a request with page size N. This effect is often much more dramatic (i.e., the request with page size 2N would take much less than double the time) but depends on several other factors. - Requests for pages beyond the first will generally be slower than requests for the first page.
- The length of the requested time range generally does not significantly affect the runtime unless the time range is so short that there are few matching data points (relative to
page_size). For example, requesting the last 5 seconds of data will naturally be much faster than requesting the last week of data, but (for a sufficient number of devices) requesting N data points from the last month probably wouldn't be any slower than requesting N from the last week.
Disclaimer: These performance characteristics may change over time, but we will try to keep this doc updated and communicate any major changes.
Overall, we recommend selecting a larger page size and using the device_ids filter (where applicable) since performance scales fairly well with page_size and filtering by specific devices will greatly narrow down the search space. This also reduces the number of pages of data, which reduces the overhead from pagination. Sample code.
Pagination
All List calls are paginated, and their responses will contain up to N results, where N is the requested page_size. The page_size is always optional in the request and defaults to 25 unless otherwise documented in the request proto. In particular, the page_size for data querying endpoints like /devices:listData defaults to 1000, as documented in the corresponding request protos.
For most endpoints, page_size must be between 1 and 100 (inclusive) unless otherwise specified. Data querying endpoints like /devices:listData instead have a maximum page_size of 10000, as documented in their request protos. A request with a page_size outside the valid range will be rejected with an INVALID_ARGUMENT error.
Every List response type contains a next_page_token field, which is populated if and only if there are more results on the next page. In other words, next_page_token is returned for all pages except the last one. Unless otherwise specified for an endpoint, all pages except the last one will be maximally filled (i.e., the size of each non-last page will be equal to the requested page_size), so next_page_token will never be populated when the returned page isn't full. Conversely, next_page_token is not necessarily populated for a full page, as the last result on the page may be the truly last result.
To request the next page of results, pass the opaque token from the response's next_page_token field into the next request's page_token field. All request parameters for the next page must otherwise exactly match those used to request the previous page, and all of these parameters must be explicitly re-specified. For example, you must not change any request filters between pages; doing so results in undefined behavior (and may result in an INVALID_ARGUMENT error in the future, but that is not currently the case). The page_token field must be empty when requesting the first page of results. Passing in a malformed page token will result in an INVALID_ARGUMENT error.
We guarantee consistency between pages. That is, a subsequent page will be returned as if the request had been made at the exact same time as the request for the first page. For example, suppose that the first page of trips is requested at 9:00am and the response contains the first 25 of 49 total trips, but a new trip is created at 9:01am. If the page token from the first response is used to request the next page at 9:02am, then the second (and final) page will contain the 24 trips (26-49) that existed at 9:00am. The trip newly created after the first page was requested will not be reflected in the second page. However, if another first page is requested at 9:02am (i.e., a request without a page_token set is sent), then that newly created trip will appear in one of the resulting pages.
WARNING: Page tokens expire one hour after the time when the first page was requested. Passing in an expired page token will result in an INVALID_ARGUMENT error. Requests for any subsequent page will not affect the expiration time.
Currently, the order in which results are returned by List endpoints is unspecified (unless otherwise documented in the response proto) and may change over time.
General API Behavior
Output-only fields
Many fields in the protocol buffer message definitions are marked as "output-only" fields, such as Scout ID fields in Trip and Asset. Output-only fields are read-only, and their values are managed exclusively by the server. These fields are ignored by Create and Update calls unless otherwise specified. However, we will not reject requests that have output fields set; we will silently ignore them when processing the request. This behavior allows you to, for example:
- call
GetTrip - modify a non-output-only field in the returned
Trip, and - use that
Tripin a subsequentUpdateTripcall without explicitly clearing the output-only fields.
Unless otherwise specified, all output-only fields will be populated in protocol buffer messages in responses from the server.
Synchronicity
Currently, all API endpoints are synchronous, so you can safely assume that an operation has completed as soon as you receive an OK response from the server. Subsequent requests will immediately reflect the results of your operation. For example, if you call UpdateTrip and then immediately call GetTrip after receiving the response, then GetTrip will return a Trip reflecting your changes.
Error handling
We follow the standard gRPC error model; see the official documentation for details. Note that the gRPC status codes are better documented in gRPC's official Github repo.
In future API versions, we may migrate to the richer error model in order to provide you with more granular error details.
For debugging purposes, we return a developer-facing error message with every error. These are not intended to be shown to users and may change without warning over time, so do not rely on the exact contents of these messages.
Visibility
API calls made from your service are automatically associated with your organization. You cannot list or interact with entities that are not associated with your organization, and attempting to do so will result in a NOT_FOUND error. Specifically, you can interact with:
- devices that have been provisioned to your organization by us,
- assets you've created, and
- trips you've created.
Parent/Child Organizations
Organizations are able to have Parent and/or Children organizations. Parent organizations can see the data of all its child organizations. Child organizations can only see their own data.
Note: We do not support grandchildren, such that A is a parent to B and B is a parent to C, does not mean A has access to the data of C. A will also have to be a parent of C to have access.
gRPC Docs (Deprecated)
Chorus used to offer a gRPC API, however only OpenAPI is supported now.
We encourage customers to use openAPI because it is restful API with Json data, a more widely adopted standard than gRPC and protos.